
2. Once you’ve logged into your Blogger Account, click the Template tab and then select Edit Html.
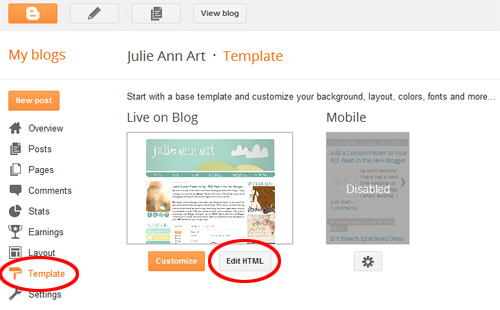
Click Proceed, and an html box will pop up. Be sure to check the “Expand Widget Templates” box.

3. Look for <div class=’post-footer’> and paste the code directly after that.
4. Save your Template and you should be good to go!
Note that this coding makes the Pin It button appear on the bottom right side of your posts. If you want the button on the bottom left side of your posts, replace the <div style=”float: right; margin: 4px;”> coding with just <div>.
You can also customize your Pin It button. I used the standard Pin It image that Pinterest supplied, but changed its color to match my blog. You can really use any image that you want. Once you create it, host it online, and put its link in place of http://img.photobucket.com/albums/v419/green_tea/pin.jpg in the coding above.
Adding a button to your blog is a great way to help readers keep track of their favorite posts from your blog! They can easily find, or be reminded of, DIY tutorials they want to try or products they want to add to their wishlist! Give this Pin It button tutorial a try!


You’re the best! Thank you for sharing this.
http://shannonhearts.blogspot.com/
YAY!!!!!!!!!!!!!!!!! Thank you! You do not know how long I have wanted to know how to do this! Your directions were amazing. Thank you for being a blogging angel! XO
This is awesome!!! Thanks so much!!!!!!
This was a great help! I did it! I’ve been trying to figure that out since forever 🙂
THANKS!!!
Oh my gosh, I think I have done it! Thanks to your help! I didn’t edit my html though (chicken) I clicked “settings” “basic” and then “posts and comments” and added the code there. (less damage if I messed up?) Anyways, just pasted your code there, and did a test post, THERE IT WAS – all beautiful and “pin it”-y. THANK YOU!
This actually worked for me! Thank you!
Wow, you’re just awesome! Thanks! It works like magic. 🙂
Awesome! Thank you for sharing!
Aw man! Thank you from the bottom of my heart! All this computer jargon makes me nervous that I’m gonna screw my blog up but it worked great! The hardest part was looking for the post-footer line! LOL
thx so much for sharing! I couldn’t find this any where! Do you have tutorial on a tweet & FB end of post button? =)
callelillycafe at me.com {including just in case you can help. thank you}
Thanks for this!! I love the color, too … it matches my blog! :o)
thank you so much! it worked like a charm! although i don’t understand how to change the color.
Thanks for sharing this great tutorial! I’ve linked to it in my post about blog re-redesigning (don’t want to promote myself, but lots of bloggers seem to want to see the post they’ve been linked to, so here’s the link: http://cocalores.blogspot.de/2012/07/tutorials-ans-ressources-for-your-blog.html). xo Anja
Just the tutorial I was looking for! Thanks! It also matches my blog!
Amber @ The Teacher Life
Thank you so much for this tutorial.
Thanks! That was super easy!
Great tutorial! Thanks a lot!
GREAT help. Thanks so much for this easy way to add Pin it. (Momma’s Fun World)
Hey thanks for sharing, it worked 🙂
Samantha
http://randomandsam.blogspot.com
Thank you! I had done this before but completely changed my blog’s template and lost it, so I searched google and pinterest to find instructions that worked since I hadn’t saved my earlier ones. Yours were the only ones that worked!
Bonny @ thedomesticatedprincess.blogspot.com
I did it!!!!http://therecessionprooflife.blogspot.com/
THANK YOU!!!
Thanks so much for this, I’m going to try it! I’d like to change the color to something that matches my blog…I’m wondering how you did that 🙂
Awesome. Works like a charm! Thanks so much!
Thank you!! So easy!!
Been looking for this code for such a long time!! thank you!!!
Great tip. Just tried it and it worked. It was super easy.
Thanks so much!
Thank you so much! It was super easy and works perfectly!
Thanks so much for sharing!! I’m so happy with my button 😉
Nothing happens when I click on the pin it button, did i do something wrong?
thank you! That was really easy to follow!
Hi. I could not find class=’post footer’
even with using ctrl f on my blogger page. Is there another code line to look for?
Thanks for the tutorial. I’ve just used it on my blog.
I have the same problem as Irina..I click the button and nothing happens. Just a blank screen. Any advice? Thanks!
Thank you so much!!! Very easy to follow!
I got the code in but it doesn’t link?
Any thoughts?
http://www.mypricelessfishers.com
thank you so much for sharing this! The first tutorial that was easy and actually made sense 🙂
-Jesse
willowgrandblog.com
Thanks a bunch for this tutorial! I’ve shared it on my blog with a link back here:
http://newendstudio.blogspot.com/2013/03/quick-pinterest-tip-for-blogger-and.html
This worked for me, however, when i click on pin it, it brings up all of the pictures on my blog, not just the ones in that post. Is there some way to have it only show the picture in the post I want to pin? It pins my entire blog, not the post. Thank you 🙂
THANK YOU!!!!! I have been trying to add the “pin it” button to my blog for over an hour now, and no other blogger tutorial I found on the web (there were lots!) worked! But yours did! Thank you SOO much!
thisislifeatourhome.blogspot.com
Thanks for sharing! You made it so simple to figure it!
THANK YOU! THANK YOU! THANK YOU!! I finally did it. Thanks for the easy instruction.
I don’t see an option to Expand Widget Template, so I guess that’s why I cannot find “div class=’post-footer'”
Any ideas??
Ok, I figured out how to manually expand all the widgets (shew), but it didn’t work. Any idea what went wrong? Thank you.
I can not find an “expand widgets template” button. Any advice?
Hmm, it didn’t work for me. Like others, I didn’t see “Expand Widgets” button, but found the “div class= ‘post-footer’ and copied the code directly after. The Pin It button did not show up anywhere.