[et_bloom_inline optin_id=”optin_6″]
A while ago I came across this studded iphone case from Threadsence. I thought it was super cute but too expensive. So I put my craftiness to the test and made an attempt at my own.
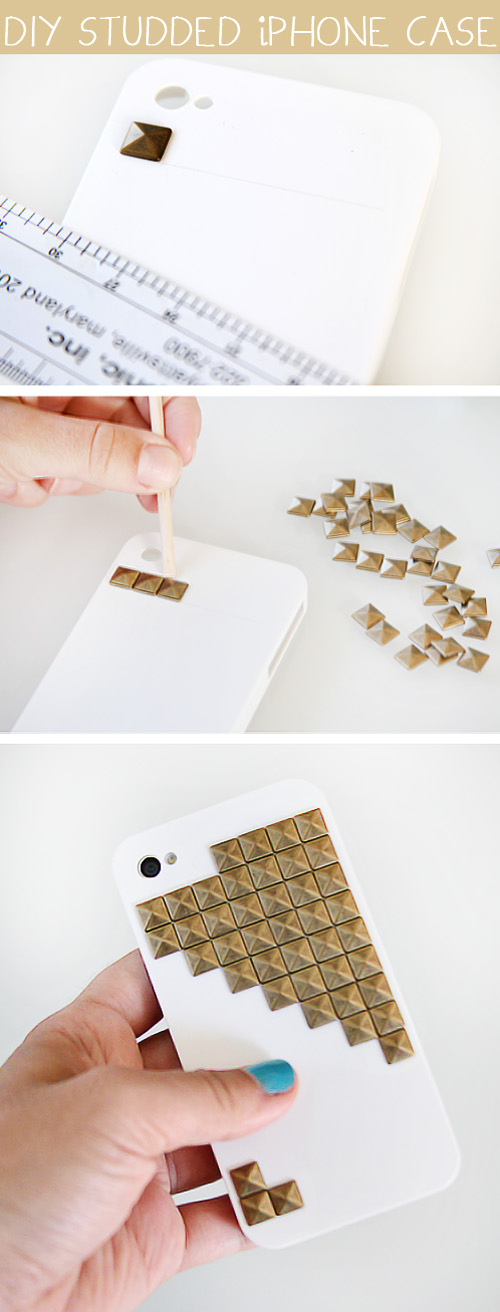
What you’ll need:
Phone case (I got 2 for $5 on Ebay)
Iron on studs (make sure they have no “legs”)
Krazy glue
Ruler
Pencil
I laid out my design first before gluing anything, just to get an idea of how it would look. When I got an idea of where the placement would be I removed all the studs but one to mark the “start.” Using a ruler, I drew a line lightly with a pencil to use as a guide. Time to glue!
Put a small dot of glue directly onto the case, where you’d like the stud to go. Quickly place the stud on top of the glue. I ended up using a manicure stick to get the stud in the correct position as quickly as possible. As soon as I got the placement right I stopped touching it and moved on to the next one.
In order to maintain a straight line of studs, it’s best to take your time. I even took a break after a couple rows because I felt myself starting to rush. Once you have all your studs glued, leave the case alone! No touching for at least 24 hours! This was hard for me because I’m not good with waiting, but I knew I had to let the glue dry completely so they studs would hold as long as possible.
I love my new case! Super easy and super stylin! Good luck. :]


This is so cute, I love it!!
xo
You are so creative and cute. And this is such a good idea!
What a great idea! SO cute!
This is great! I really want to try it.
That’s the coolest case I’d ever seen! Thank you so much for sharing!
shut up. such a good idea. i love it!
this is the best idea. i’ve seen the studded cases but didn’t want to pay the price…this is perfect. i’ll be giving this a try fo’ sho!
xoxo
ali
I love this! So very cool! 🙂
Perfect! i’ve been looking for a tutorial on how to do this! i’ll have to try it! 🙂
great info here!
oh hi. you’re brilliant. love you.
Awesome DIY. Thanks for sharing!
excellent idea.
lovely!!!
Where can I get those studs? I had exactly the same idea but I couldn’t find studs :/. I live in Holland so maybe you can send me a website where I can order them? Thank you in advance :).
Hi Ellen, I bought them online here: http://www.etsy.com/shop/studsrus
Love the D.I.Y!
xo,
http://missmelissafashionandbeautyblog.blogspot.com/
hi! i wanted to know what size your studs are. there are so many sizes!
Hi Lisa! I got 8mm Antiqued Bronze Metal Iron On Pyramid Studs.
The first thing I thought when I saw this was tetris….I’m going to spray paint the studs and make myself a ‘gaming case’ 🙂 Thanks for the great idea
hey julie! i just finished making this case for my sister- it’s super adorable, thanks for the tutorial!! i’m not the neatest person in the world and smeared glue in a couple of wrong places. if you encountered this problem as well- any idea how to get the glue off the plastic?
Hi Julie! I loved this post. I’ve seen similar phone cases sell for about $40 bucks. I love making things too. It just means so much more when you can say…”I made it myself.” I may grabs some studs from Etsy and make one for my sister on her birthday. She loves anything (and everything) studded.
Hi! is the iphone case rubber?!
depends on what kind you buy
Das ist ja richtig schön geworden. Hast du super gemacht.
What a nice idea. I’m going to make this really soon.
Thanks a lot for sharing.
That is so cute! where do you get the studs?
I bought them on Etsy. Just search “Iron on studs”
Where to buy this kind of studs? I never seen this kind of iphone case. Am also try this. Pelican Military Cases
I bought them on Etsy. Just search “Iron on studs”
I just got one sunday but am terrified I will drop it. A new case would be great! is bubblegum casting legitimate
love the idea i should really try it. one question though…… how much money does this cost to make the whole case including the studs(etc?) Im not a multimillionaire!!!
$5 tops.