Hi Julie Ann Art readers, my name is J and I blog over at My Life in Lavender. I’m happy to be guest posting on Julie’s blog today to show you all how to make a super cute collage photo frame!
The supplies you need should be very easy to find: a photo frame (I chose an old one I had laying around to spruce up), glue, old magazines, scissors, and a paintbrush.

First, take some time and go through the magazines cutting out patterns and colors that you’d like to collage. Make sure to cut different shapes and sizes.Then, put a little glue onto the photo frame and stick on the magazine cutouts there. The paintbrush comes in handy to smooth the glue around, and makes it easier to avoid too much glue clumping in one area.

Take the scissors and cutout any excess magazine cutouts around the frame. Finally, use the paintbrush to apply a fine layer of glue to the entire frame, to seal the magazine cutouts into place. Then, let the frame dry and you’re set to go ahead and place photograph inside!
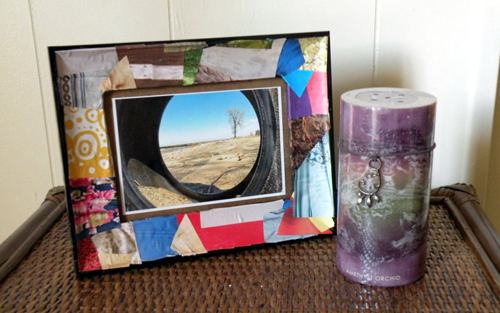
This collage frame is ideal for finally getting around to using those old frames that have been sitting in a corner, or just taking a simple frame and sprucing it up a bit. Have fun!
**Last week’s Blowfish shoes giveaway winner was #217, Gina M. Maddox! Congrats Gina, you should receive an e-mail shortly!**
*Don’t forget to enter J’s jewelry giveaway here!*


This came out do adorable! :)) Gonna have to try it asap!
i used to LOVE doing this.
This is really cute. I’ve never thought of sticking pictures to the frame I just always paint it in some way. Thank you for sharing this wonderful idea.
I love doing this with old maps and photograph frames!