Greetings, Julie Ann Art readers! My name is Emily and I’m visiting from the Anna Delores blog. The amazing (as you already know) Julie Ann agreed to let me share a fun nail trend that is also really, really easy to execute: ombre nails.
The ombre manicure made its appearance as a hot trend last summer, and it’s back and better than ever for 2012. You can go matte, shimmer, glitter, or merge colors on one nail with sneaky makeup tool tricks — but I’m giving you the EASY version today, just to get you started.
When I first saw this trend, I thought I’d need five different polishes in the same color family, just lighter and darker versions of each other. I knew I had enough polishes to make it happen (I think I have 15+ polishes just in pinks), but shades can vary so much — some are warm tones, some are cool tones, some are shimmery, some are matte, etc. But THEN I realized: all you REALLY need is one dark polish and one white polish. See where I’m going with this?

For my color inspiration, I decided on “Devious,” a midnight purple shade in a creamy matte (no shimmer) that I got from Ulta (whose eponymous nail polish is buy one, get one free right now!). For white, I used Sephora by OPI in “A-ha! Moment,” a bright opaque white.
Perhaps this is obvious, but I recommend doing all your manicure prep before pouring and mixing colors, as once you measure out your polish, it (of course) starts to dry. Because I got excited and poured my polish before applying my base coat (Nicole by OPI Base Coat Plus), the polish was a little thick and had already started to harden when I was ready to apply. My end result wasn’t as tidy as it should’ve been, since I was negotiating with half-dry polish. Yuck.

Measure out four dollops of your dark polish (I originally did five because I was thinking, five fingers, right? But for the fifth one, you can use the original color out of the bottle, of course! Duh, Emily). Add drops of white to each, one at a time — mix as you go so you can see if you need to go lighter or darker, and adjust the remaining “swatches” accordingly. I had to fuss with mine a little to get the right gradient of colors.
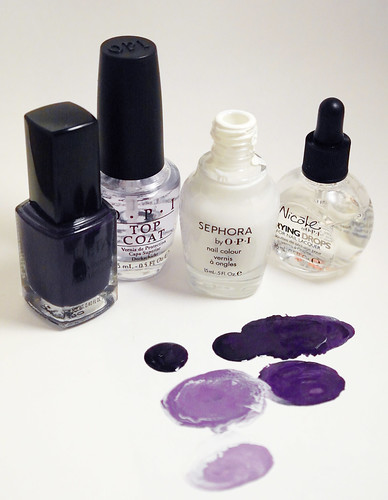
And voilà! You’ve got your ombre palette. You can start at whichever end you like (your pinkie or your thumb) — I opted for starting dark on my pinkie and then working my way over, but you can do it the other direction, too, of course! It’s up to you.
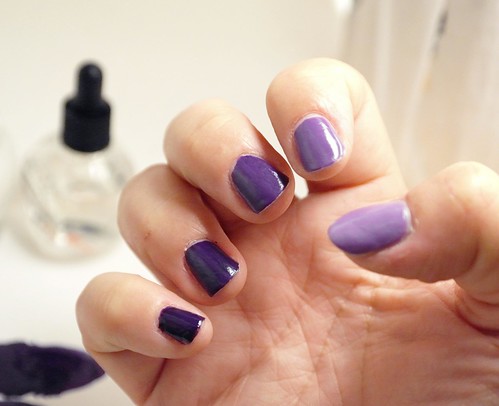
And that’s that! I TOLD you it was easy. Finish with your favorite top coat and some lacquer-drying drops (just 1-2 drops per nail) — I used OPI Top Coat and Nicole by OPI Drying Drops.
You can do this with pretty much any color as long as it’s dark enough to begin with; the darker the shade, the greater your flexibility in making the gradient as dramatic as you like! I could’ve gone a lot lighter on my thumb color and thus had a more dramatic dark-to-light transition (as it is, the shades on my pinkie and ring finger look almost the same unless you’re examining them in bright sunlight!). I like the subtlety of a tame gradient, but experiment with the colors and make it your own.
A few other color ideas to whet your whistle (and don’t you love that glitter?):

And this is a whole other level (I think this is the true 2012 reincarnation of the ombre nail, but I’m just not ready yet):
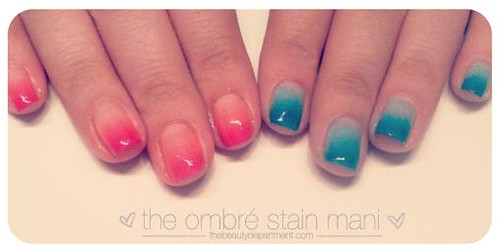
Images via The Beauty Department.
Enjoy, and let us know if you try this out! And come say hello!
xo,
Emily


very cool! thanks for the tutorial! I think I’ll try it out today!
xo, Tina
http://www.tinacious.me
Great tutorial, thanks for posting this!
xoxo
~Natasha Fatah~
~Natasha Fatah~
Very pretty. I’ve been wanting to try this.
http://shannonhearts.blogspot.com/
Sweet!! I musta been so uncool last year, because I’ve never seen this! But now that I’m cool I’ll definitely be trying this this weekend!!
Thanks all! Poppy — I didn’t know about it last year, either. I’m much cooler this year too. 😉
I have been wanting to do this but didn’t want to buy so many shades of one color! This is so smart! Thank you!
-Tori
torigjohnson.blogspot.com
You’re welcome, Tori. I know, right?!
Ohh I love these! Going to try experimenting! Thanks 🙂
http://munchtalk.blogspot.com/
Wow! That is super pretty! I’m going to try it our as soon as I get the chance! Thanks for the easy tutorial:)
How do you put the polish on without getting it all over the brush? If you use the brush to the dark paint you’ll change its color by putting it back in with a light color on the bristles!
Beautiful, by the way!
I wiped the brush clean with a paper towel between each shade. There’s definitely a possibility of polluting the original color once you put the brush back, and getting streaks on your nails, but it’s just a risk you gotta take! 🙂 I suppose the other option would be to buy some cheap little paintbrushes to use if you wanted to maintain total purity.
I just did my first set of ombre nails! I did the one where each nail has it’s own ombre and they were a lot easier than I thought!
Here’s the ones I did : )
http://instagr.am/p/JtEq8BH9Ok/?fb_action_ids=3775283142254&fb_action_types=instapp%3Atake&fb_ref=ogexp&fb_source=timeline_story
Good to know it’s easier than it looks! I will try soon. Thanks for the share! 🙂
Just a thought..you could dip the brush into polish remover, then wipe it off with a paper towel between colors.
Just a thought..you could dip your brush in polish remover and then wipe it off with a paper towel between colors.
Awesome tuorial! But dont’t you think you should be giving some credit to http://thebeautydepartment.com/ for the images you used? They deserve it for all their hard work! But lovw the puurple you used for your tutorial!
Hi there! Since this was a guest post I didn’t realize the photos were not that of the writer. I happily credited the photo to the direct link at The Beauty Department! xo JA
I tried this and it looked really cool. But then I went and washed my hands and almost all of the ends peeled off! I put a top coat on and I allowed it to dry for over an hour. What did I do wrong?
Thank you for posting, It is such a great idea! : D I will try this soon!
I tried this and it was a mess 🙁 the nailpolish dried out before I could finish and I couldn’t wipe off excess because I couldn’t use the bottle. Love love love how this looked when you did it and good tutorial but it didn’t work for me
What a great idea!
Cool! Just bought an awesome purple so will b trying this.
Loved the look and wanted it done for vacation in Aruba. I went to a salon(don’t go often) and asked if anyone knew how to ombre and first reaction was that no one knew what I meant. I even showed your pics.That day was just fact finding mission. The next day when I went for manicure a diff person said he knew what it was but was a trend a long time ago, was not that popular.I took that to mean that he didn’t know how either. I”ll keep looking or until I built up enough skill to DIY.