I have another stencil tutorial to share today! I really love the idea of transferring a design onto a material. I’m trying to find out the best technique that works for me. I started with the Freezer Paper Stencil and today I tried the same idea with contact paper. Contact paper is often used to decorate the inside of drawers, so it already has a sticky backing.

Since I’m currently decorating the house for Halloween, I went with a skull and crossbones design! You can find a lot of free printable templates here.
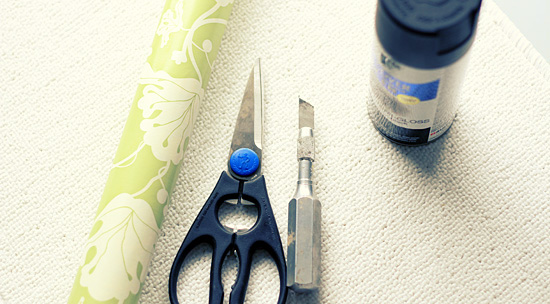
What you’ll need:
Rug (wash first!)
Fabric Spray Paint
Scissors or Exacto Knife
Contact Paper
The first step is to get the design on the contact paper. I drew my design directly on to the paper. Another option is to print out a design online and trace it onto the contact paper. If your printer doesn’t print as large as you’d like, Kinko’s makes large copies for a good price.

Using an Exacto Knife or Scissors cut out around the edge of your design.

Then cut out the edges on the inside of your design. Make sure to keep those cut-outs!

Once your design is cut out, slowly pull the backing off the contact paper to expose the sticky area. Carefully lie the sticky side of the contact paper down onto the rug in the position you’d like it. Smooth it out, paying special attention to bubbles around the edges of the design.


I wasn’t completely positive that the contact paper was sticky enough to hold the design while I spray painted. I ended up using a little bit of tape to tighten the paper on the rug as much as possible. Also, for the smaller pieces of paper used for the details of the design, I coated those with spray adhesive before putting them in place on the rug. I was worried that the pressure of the spray would blow them off.
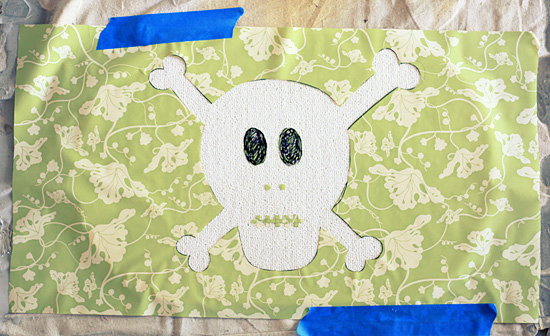
I started painting by putting on some gloves and putting pressure around the edges of the stencil to prevent the paint from bleeding. But it turned out that the contact paper did stick to the rug pretty well. I only had one area of the design that didn’t have a completely crisp edge. Otherwise, I was pretty impressed at how this contact paper worked, despite my doubts!

Have fun!


Great tutorial. =) I just might have to try…Right in time for Halloween, I’m sure my son would love for me to try the skull & crossbones too.
~Kim
from Blogging Buddies
eeek! Love it! I am now searching my brain for a possible image I’d like to try out this awesome tutorial with and the rug- what a cool funcational option! 😀
Wonderfully inspiring! Thank you!
😀
Des.
What a great idea! I haven’t loved any of the welcome mats I’ve come across thus far that were within my price range, I’d love to make a custom mat like this instead.
http://www.bruinetteinwonderland.com
how cool! I love how this turned out, what a fun idea!
-rachel w k
rwkrafts.blogspot.com
That’s pretty cool! I haven’t tried this method before; good to know it works!
Great tutorial! Your skull and crossbones stencil is awesome.
I like this, and I like your blog.
thanks for sharing, i’m stopping by from tip junkie and would love to have you stop by my blog and check out the huge ($100) giveaway going on now- http://thelovelypoppy.blogspot.com/2011/10/blog-follower-giveaway.html
Me ha encantado!!!!
Yo tengo un blog de DIY por si te quieres pasar
http://trasteandodiy.blogspot.com.es/