
Since we moved we haven’t had any pillows for our couch. The main reason we don’t have pillows? Penny’s favorite thing is pillow stuffing. She will have the stuffing out of that pillow in a matter of minutes (seconds?). So no way am I buying a fancy schmancy $$$ pillow set. I bought one pillow from Ikea, sort of as a test. Maybe she grew out of her pillow chewing habits (yeah right). But this one white, boring pillow needed some help. I was throwing around different embellishment ideas when I remembered I had been wanting to try to make a stencil out of freezer paper. So here we go!
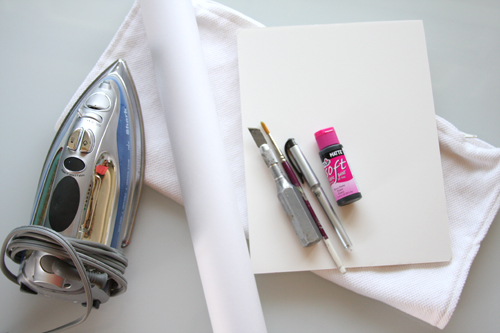
What you’ll need:
Freezer Paper
Fabric (pillow case, t-shirt, placemats, etc.)
Fabric Paint
Iron
Exacto Knife
Pencil or Pen
Paintbrush
Cardboard

The first thing you need to do is transfer your design to the matte (not shiny!) side of your freezer paper. This can be done in multiple ways. I drew my design directly onto the paper. If you don’t feeling comfortable doing this, you can either a.) print the design on normal paper and then trace it on the freezer paper, or b.) print the design directly onto the freezer paper. Just make sure you only use an ink-jet printer if you’re going to print on it. Your call!

Next up, using your exacto knife, cut your design out of the freezer paper. Make sure to put some cardboard underneath the paper to make this process easier. This was surprisingly easy, the freezer paper didn’t give me any problems with tearing.

Once your stencil is ready, place it shiny side down where you want it on your fabric. Heat up your iron (I put mine on medium heat) and carefully start ironing, working your way from the middle of the design to the outside of the design. I went over my design multiple times. Make sure to pay attention to any intricate areas.
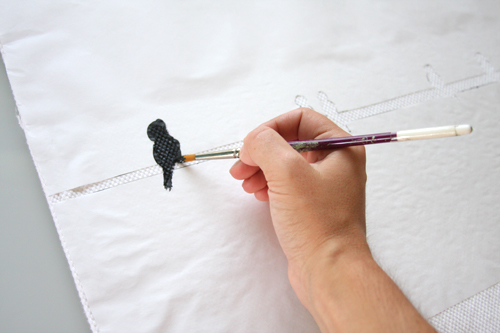
When the freezer paper is secured to the fabric it’s time to paint! Once again, make sure to cover all the intricate areas and edges completely. I got nervous at this part because I wasn’t sure if I had ironed it on well enough.

I let the paint dry for about an hour (although the paint bottle said it takes four hours to dry) and started pulling off my stencil. Whether you decide to wait the full four hours or not is up to your discretion. The stencil pulled off easily and now I have a cute little pillow.
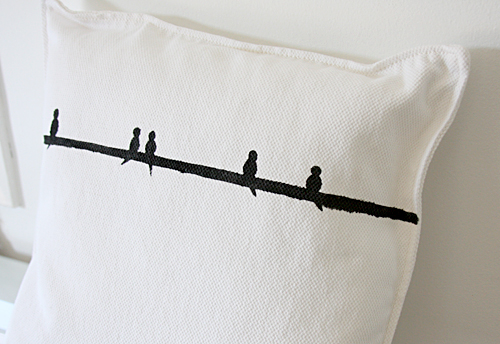
The possibilities for use of a freezer paper stencil are endless! I definitely want to try it on a shirt next. The looks it gives is very similar to that of screen printing. And don’t forget you can use freezer paper for what it was originally intended for…to store meat in the freezer. Have fun!


I want to try this! love it! 🙂
I’ve never heard of freezer paper! Definitely bookmarking this to do later.
Oh wow looks fantastic, will have to try this!!!!
Thank-you!
I’ve always wanted to try this but I haven’t gotten around to it. Your instructions make it look pretty easy!! Maybe I’ll make something for my niece’s college dorm 🙂
such a cute idea, i’ve been thinking i should try this one out. considering how cute your pillow looks, i’m def going to now!
absolutely adorable!! You could sell those!
This is a FANTASTIC idea! I will be doing this soon!!
adorable!! 🙂
http://lovesimplegreen.blogspot.com/
I used freezer paper to put photos on fabric to make a pillow… ironed freezer paper (shiny side down) onto my fabric, cut out a legal paper size and put it into my printer fabric side down,,, it printed on the fabric beautifully! 😀 Great gift idea for Grandparents. LOVE LOVE LOVE your pillow! Deff. going to try this next. Thanks for the wonderful idea :))
I dont know freezer paper but thinking of trying this out with a sticker…
will share my experience then…
You drew up a great design! Love the black on white.Did the pillow survive? Just pinned ya!
Unfortunately, the pillow did not survive! :[
Why did the pillow not survive?
My dog chewed it! 🙁
Super cute! I need some new pillows for our couch! 🙂
Love the design….very nice! Will be trying soon.
Thank you so much for this tutorial…it was very helpful
Super cute. Love the birds!
Janeane
http://www.designwithj9.wordpress.com